A Successful First Video Edit [Case Study]
You know that awesome feeling when you teach something and then it totally lands?
That’s how I felt when I watched this video:
Last year, I taught a class at a Bronx high school for an EDsnaps summer program run by Susanne Cappendijk. Her daughter, Lisanne, listened to my class and then went off and made this video from scratch. I love every frame of it!
Editing took her about 3 full days – which sounds about right for that amount of footage and a first time editor. She used a pre-set graphic template that iMovie offered with a school-theme (how perfect is that) and used music from a royalty-free YouTube music library recommended by her brother.
Lisanne is a fantastic example of how with a little guidance, you can create a great DIY video for your organization or business.
Lisanne is a fantastic example of how with a little guidance, you can create a great DIY video for your organization or business.
Throughout this blog post, I will provide you with what you need to know and consider when organizing your edit, choosing editing software/apps, and what to consider when you’re thinking of hiring a video editor.Here’s what we’ll go over in this blog postA
Here’s what we’ll go over in this blog post:
- First Steps: Organizing Your Assets and Creating a Workflow
- Choosing your Software
- DIY Edit Best Practices
- DIY Resources
- When and How to Hire a Professional Editor
- Final Thoughts on Editing
- Editing Resources and Glossary
1. First Steps: Organizing Your Assets and Creating a Workflow
Video footage can be daunting. There are so many clips, and they all sound and look more or less alike. I’ve been there, I know.
Typically, there is a 20:1 ratio from shot material to the final video.
That means you have about TWENTY 30-second clips to go through for a 30-second video. It doesn’t sound like much, but much like a wine tasting, unless you’re a connoisseur, it all becomes an indiscernible mish-mash very quickly.
Establish a workflow from day one. Footage takes up a hell of a lot of space, cameras auto-name the video clips, and editing software creates render files you don’t want to touch. So make sure from the get-go that everything is where you want it to be!
Here are a few steps to remembering while Shooting your Video to set you up for a good edit.
- Figure out how your footage gets from your smartphone (or camera) to your filing system (i.e. Dropbox, Google Drive, etc). Have a dedicated hard drive for editing – you do not want to edit off your computer’s hard drive.
[Note: If you’re doing a bigger edit and using a professional software like Adobe Premiere Pro, the drive you edit from should run at 7200 rpm – those drives are a bit more expensive and will save you from project file ‘crashing’ issues and dropped frames.] - Have a second, dedicated hard drive for backups.
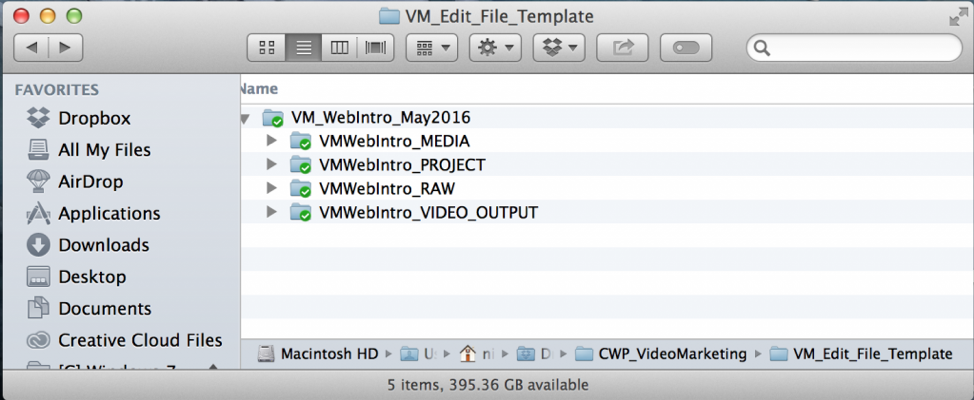
- Establish a folder system and naming convention for the folders and keep it as a template (see screenshot examples above.)
- Create a folder for each video project.
If this seems a bit of overkill for a simple iPhone video shoot, I can tell you from painful experience that it’s not. When I ventured into the DIY video marketing I realized that all the set-up we do on professional shoots is equally as necessary for a DIY shoot.
Here’s why: Any video recording device will name the clips you shoot at random (not random to them, but to humans), files are huge and will need to be stored on external hard drives, and professional edit software creates render files that need to have a “home”, because once they are created you do not want to move them (trust me).
Don’t fall into the trap of footage overwhelm before you even start editing:
- Be realistic about what you can handle: Keep clips super short. Stay with a single clip.
- Do an edit “dry-run” with a sample video clip. Try a few apps and see what you like (For guidance & inspiration.
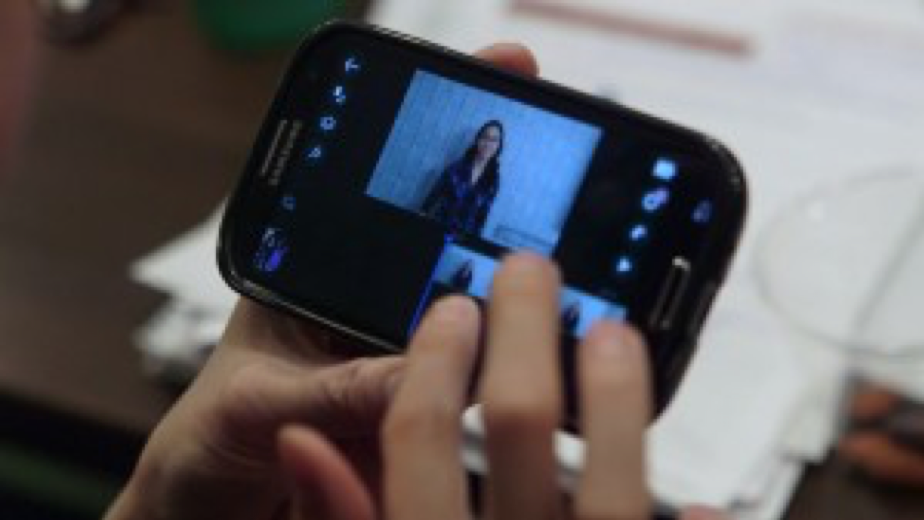
- Take notes while you shoot & identify each clip (see photo below)
- Organize your footage into folders.
- For in-depth video editing learning, I also recommend Lynda.com
- If you have a longer, or complex story to tell: Hire an editor.
- If you have little, or no time: Hire an editor.
- If you’re not patient and don’t love figuring out “things” (aka software): Hire an editor.
2. Choosing Your Software
If you have the time to invest in learning and doing your own video editing then you’re going to want to use software/applications that give you the most support.
New apps and software, as well as software updates, can change the editing landscape fast. For Apple users, iPhone and Mac come pre-loaded with iMovie, which is very serviceable for a basic edit, but you will reach its limits fast if you’re into graphics.
Similarly, PC’s come pre-loaded with Windows Movie Maker, which is an even more limited software than iMovie.
In general what you want to look for – as a minimum – in an editing software or app, is the capability to do the following:
- Trim & Cut: take apart your footage
- Transitions: dissolve, cross dissolve, fade in from black or white, and fade out to black or white
- Add a title
- Add a photo
- Add music
- Have multiple video (visual) tracks so you can see one track, but hear the audio from another
- Output to save to a folder of your choosing
- Add captioning (transcription of what is being said in the video)
Here the apps I use, and how I use them:
1. Adobe Premiere Pro CC (Creative Cloud) | Desktop | Mac & PC
If you’re super ambitious: Adobe Premiere CC is a professional edit software within the Adobe Creative Cloud package and it’s the current industry standard. I use it for all the videos that I edit on my desktop.
- It’s superior in its interaction with any other Adobe product, in particular Photoshop, which I use for graphics and to create custom thumbnails.
- It can manipulate sound and layer pictures and additional stock footage easily.
- It can output into any format, size, and codec
[Note: Final Cut Pro and Avid are still being used but compared to Premiere they are unnecessarily complicated, or not fully featured (Final Cut Pro X), or not supported anymore (Final Cut Pro 7)].

Pros:
- Fully featured editing software
- Fully integrated into ALL Adobe software
- Intuitive and forgiving for “basic” editors like me with limited technical knowledge and skills (as compared to Final Cut Pro and Avid)
Cons:
- Steep learning curve because it’s fully featured
- Pricey compared to non-professional software. It’s part of the Adobe Cloud software package which includes After Effects (Animation), Photoshop, Illustrator, etc.
2. Adobe Rush | Smart Phone | Mac & PC
Adobe Rush is a smart phone edit software from the Adobe family and is surprisingly full-featured. The one reason I’d use it over the iMovie app: It has the capability of using layered graphic files! Great for titles, logos, etc.
It has a fairly quick learning curve, but I did bump against “thick thumbs” issues. It also isn’t free and only accessible if you have a Adobe subscription.
3. Animoto | Cloud Platform | Apple & Android App
Animoto is a fast, super easy to learn video editing platform. I used it a few times a year ago when my Premiere chops weren’t that great yet. I just wanted to trim a few YouTube videos to show during my presentations and workshops, and not have to go through an entire editing “process” of setting up folders and workflows.
Animoto also has a few cool features like split screen templates, which are awesome if you want to produce a “how to video”. You could shoot a person explaining something in one section while showing the visual of that thing being done in another section.
Pros:
- A quick & easy learning curve
- Decent music library
- Very well priced [for an additional 10% off click here for our affiliate link]
- Split-screen features
Cons:
- Very basic: You can’t separate sound from your video
- You can’t move around graphics much
- You don’t have transition options
4. Magisto | Cloud Platform | Apple & Android App
Magisto’s magic is artificial intelligence. This means you don’t have control over the editing, but the application does put slideshows, photos and clips together within minutes and it has a very nice music library.
If you don’t care about control of your clips and the default hokey transitions (there are also templates with ‘clean’ transitions) then you will be in heaven.
Pros:
- AI-based and automated editing
- Auto sync to music
- White-label solutionfor high-volume users
- Decent pricing
- Great customer service
Cons:
- No control over your edit
- Some templates are very tacky
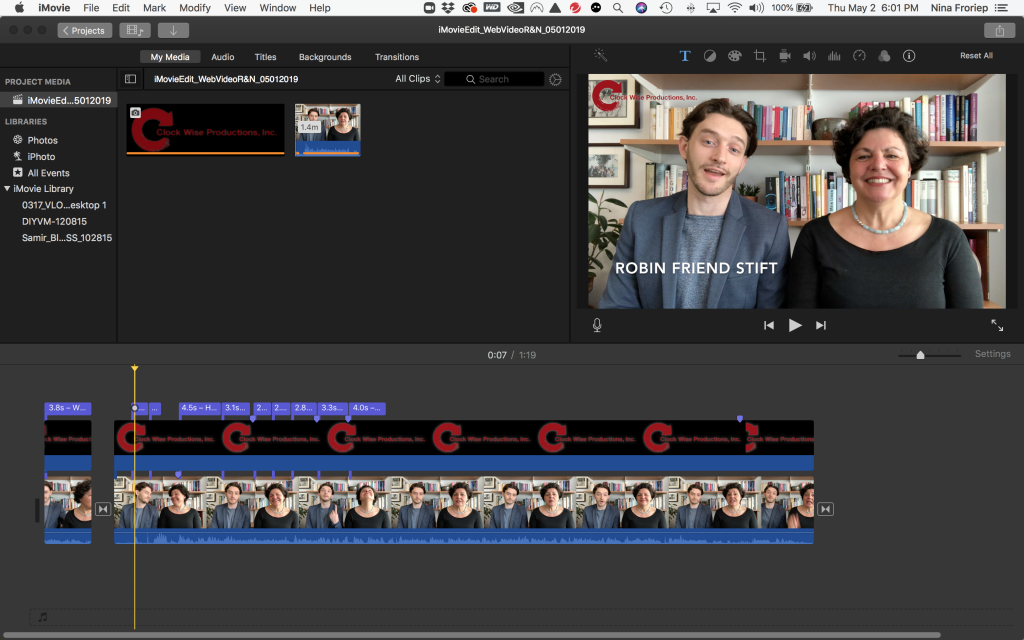
5. iMovie | Desktop | Mac
Mac’s integrated video software is constantly evolving and the newer versions of iMovie are full-featured enough for a non-professional video marketer who needs a few videos for her small business to make it happen and then some.
Pros:
- Free with your Mac (older versions are still clunky: Make sure to always be on the latest version)
- Fairly easy to learn
- Newest feature: Import o files with transparent backgrounds is now possible so you can layer logos over footage for instance!
Cons:
- Limited graphic uses – mostly stuck with tempates
- Limited fine-tuning of your video
6. iMovie | Mobile | Apple App
Similarly, to the desktop version, iMovie as an application is also constantly updating. The changes just in the past few months have been major. Today you can perform a pretty complex edit with b-roll and audio separated from the picture.
In general, iMovie is pretty full featured. If it weren’t for the graphics still being very basic and the fact that my thumbs are too thick, I’d never bother with another edit software again.
Pros:
- Free, comes with your iPhone
- Multiple clips can be layered
- Audio can be separated from clip
- Audio can be manipulated
- Clips can be re-sized, sped up and flipped
Cons:
- In-app graphics are still very limited
- No import of graphics possible
It’s well worth learning if you’re interested in editing and investing some real time and creative juice. Adobe Premiere is subscription based and belongs to the entire Adobe bundle, which features Photoshop, Lightroom, InDesign, After Effects, etc.
When it doubt, keep it simple!
What’s The Visual Difference Between iMovie, Premiere and Rush?
Here a link to a Playlist with four videos which where edited from the exact same footage we shot with an iPhone X. Look at the graphics and look at the length of videos! We used:
- iMovie Desktop
- iMovie iPhone App
- Adobe Rush Phone App
- Adobe Premiere Pro CC (desktop)
Edit Software Comparison | 2019 YouTube Playlist
No matter which editing software you end up using: Allow for some practice time and ‘finagling’. It takes a moment to make all the decisions: where to cut a sentence out; how to deal with transitions; if the music makes sense or not; and where the graphics go. When it doubt, keep it simple!
3. DIY Edit Best Practices
Keep the order below in mind – it will save you from getting all nitty-gritty on one aspect of editing only to find out that something you’ll do later affects what you did earlier and you’ll have to re-do it. An example is tweaking your transitions to find out that when you lay in graphics you might have to re-do them all because they don’t work as you wanted them to.
The Edit Order of Things to Do Is:
For an In-phone edit: look at raw footage you want and put into dedicated folder, import from there into app.
For a Desktop edit: import all footage, look through it and mark what you want to use.
And then:
- Lay down narrative first (if that includes voice-over add that too)
- Trim, cut & splice narrative (i.e. content)
- Deal with any speed adjustment or re-sizing of clips
- Lay-in graphics (logo, lower third, title graphic)
- Deal with video transitions
- Lay-in music
- Deal with audio levels
- Pull a still from clip for a custom YouTube thumbnail
- Save often! Render and output for test viewing
4. DIY Resources
Image Resources:
- Custom graphics for edit: Either in-app, Photoshop (transparent background), or https://www.fiverr.com/
- Still images (photos, vectors, etc.): http://www.freepik.com/
- Stock footage & still images for free:
- Unsplash: https://unsplash.com/
- Pexels: https://www.pexels.com/
- Pixabay: https://pixabay.com/videos/ library)
- Stock footage & still images paid, low fee: https://www.pond5.com/
- Slide decks: DIY or outsource: https://www.fiverr.com/, or https://www.upwork.com/
- Infographics: https://www.fiverr.com/
Audio Resources:
- Music choices: Make sure you have licensing rights! Resource: https://www.pond5.com/ (~ $35 – hundreds)
- Sound effects: DYI, or https://www.pond5.com/ (~ $2.00 – $5.00)
- Voice-over (talent & recording): DIY, or http://voice123.com/ (minimum $100.00 for professional voice & retakes if necessary)
Screen Recording Resources:
Recording platforms:
- Quicktime
- Screencast
- Camtasia
- Soapbox by Wisita
- •presentation video: https://wistia.com/soapbox
5. When and How to Hire a Professional Editor
Of all the careers to be explored and be had in the film business, editing is probably the one I have the most respect for. Whatever producers, directors, camera people, and a myriad of other professionals screwed up en route to post-production, needs to be fixed and made look like it was the plan all along by the editor.
A good editor is as much a storyteller, visionary, and technician, and as she is a fixer, healer and diplomat.
As you see in the list above, if you don’t have (or want to put in) the time to first learn and then do the actual video edit then you might want to invest in hiring a video editor. If you do go down that path, here is what you should consider when making sure you get your money’s worth.
1. What makes a good editor?
- A good editor is a person who can tell a story and make smart decisions.
- A good editor will listen and understand how to tell YOUR story.
- A good editor can take hours of footage (film clips) and sort through them quickly to find the nuggets.
- A good editor will take direction and understand your video’s context.
2. What do you look for in an editor?
- Look at an editor’s show-reel and sample videos. Make sure you ask them WHAT their role was on each – it can be a hodge-podge of straight editing, animation, motion graphics, sound mixing, and color correcting (these are all separate jobs in the TV/commercial world), and all of these can be done by one person on a small project. You just want to make sure you know exactly what you’re looking at and therefore, what you would be ‘buying’.
- In their work, listen for the quality of sound, look for smooth transitions, look at overall style, and pay attention to the quality of the graphics.
- If you need graphics and animations make sure they can show you samples that they created and animated themselves (don’t assume anything).
- Make sure you like their style. Are their videos similar to what you are looking for? If not, keep looking.
3. What do you discuss with your editor?
- Workflow! How do they get the footage from you or the shooter, what software are they using, and what are they giving back to you (insist on all source folders and project files (!). You want to be covered should you need to make changes and they are no longer available.
- Discuss the scope of work (timeline, deliverables) and their hourly or day rate (here more than anywhere else: You get what you pay for).
- Listen to their suggestion of how long it will take. In general, editing takes a lot longer than you would think.
- Make sure you have at least two rounds of changes built into your scope of work.
- Go over all of the above with your editor and have both of you agree to the terms in writing.
4. Where do you find an editor?
- Word of mouth! I’d go with recommendations from people you trust.
- Upwork – I wouldn’t hire under $60 an hour – give them a small job first to see how they work and if you are “compatible”.
- Beware of deals that look too good to be true! Editors working on ancient computers, using bootleg software, or generally unskilled abound. If your editor appears to be charging well below market rate, you risk overly long edit times, corrupted files, or worse! Only hire people who display a robust portfolio, have positive references and reviews, and can provide a license for their software if asked. Vetting and paying a little more up front can save time, money, and heartache in the long run.
5. What does it cost? How long does it take?
- It depends and it depends…
- My 2-minute “talking-head” vlogs with graphics and titles but no music- take me about 3 hours to edit (this includes a thumbnail and graphics). It would take an editor about the same amount of time, but the product would be much better.
- An editor goes into multiple clips and cuts together the best parts of each (which is what you want from an editor in the first place) and that takes a bit longer, especially since they are not familiar with the footage.
- Most professional editors work on an eight-, or ten-hour day rate.From corporate, I’m used to paying $500 – 600 per day on the lower end. If you hire by the hour it’s going to be either a bit more, or your editor will have a minimum hourly. For one of my vlogs, I would expect to pay at least $350. But for something like that I’d likely do a ‘bulk’ deal to get a better rate and have three to five videos done at once.
- The difference going from a $35/hour editor to a $60/hour editor is – with a few notable exceptions – well worth the investment: Both in terms of outcome and process.
- Allow time for an editor to set up the edit, look at the footage and any other assets (logos, photos, graphic elements, music, etc.), plus about 2 hours of editing for a basic 2-minute talkie video. And then allow more time for the editor to finesse all the “moving parts” – i.e. transitions, audio, music, graphics, etc. For editors, it takes a moment to find the rhythm between speech, what you see, music, and graphics. I would say a 4-hour minimum for an edit that is just a talking head video. If you have b-roll (additional footage that plays while the “talking-head” keeps talking), double that time. Finally, allow at least two hours for feedback changes and final output. As you can see, even a small edit can turn into a 10-hour affair quickly!
6. Final Thoughts on Editing
- CUT, CUT, CUT
- Keep transitions clean – it’s better to show them, than to hide them
- What ever you do: do not fall in love with any of your shots; it will inevitably end in heartbreak. I speak from decades of experience.
- Keep it short! Remember the:
No matter which editing software you end up using, allow for some practice time and ‘finagling’. It takes a moment to make all the decisions: where to cut a sentence out, how to deal with transitions, if music makes sense or not, where the graphics go.
Even if you end up hiring an editor, you’ll still need to invest time in finding and interviewing the right collaborator and communicating with them to get the best results.
When it doubt: Keep it simple! When still in doubt: Call Nina!
7. Edit Glossary
Without going into crazy detail, it is important to get basic editing terminology right, to understand what some of the apps are offering and what some of the more advanced computer software programs are talking about.
Here a very basic glossary. The links connect to our online resource blog called Definition Day, where I post definitions of video marketing relevant words each week.
Linear vs. Non-Linear Editing: Ok, think TT (Throwback Thursday). In the not so distant, old days, editing was linear. You added one video clip to another in sequential order and going back and changing something, meant the entire sequence after your edit, meaning going forward, needed to be moved up as well. Think even further back to editing filmstrips: You took out a section of film you moved up the entire subsequent section to close the gap.
Today, all editing software is non-linear. Which mostly means that you can go into an edit totally unprepared and keep editing until you ‘strike gold’. As you can tell: I’m a fan of being prepared. A good edit is time-consuming with a precise plan and can be totally overwhelming and exponentially more time-consuming without one.
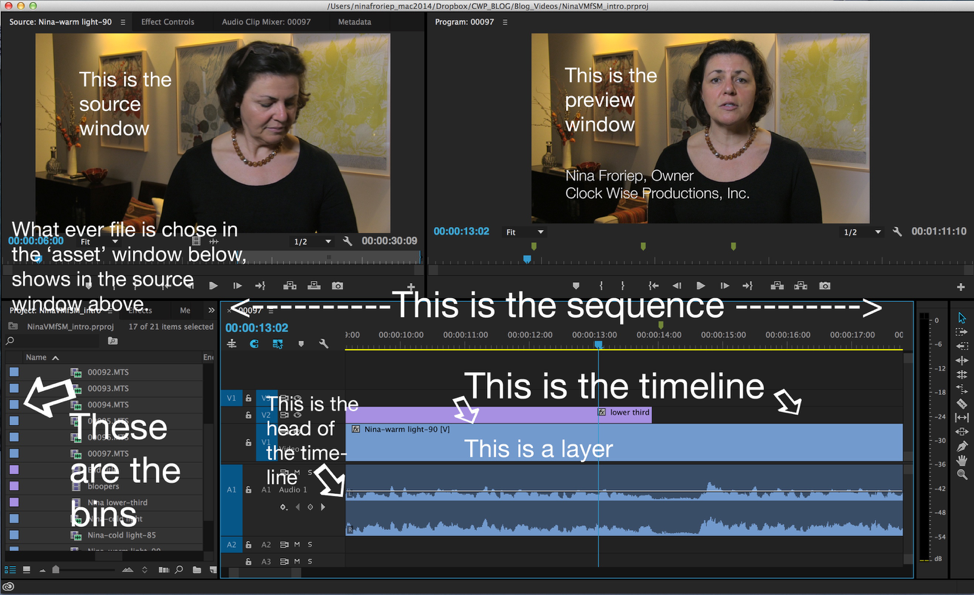
Sequence and Timeline: The video clips you are working within an editing software are put into a sequence, which is defined as a set of things next to each other in a set order. The timeline is the graphical representation of that chronological sequence of events (i.e. video clips strung together).
A timeline starts at the head and ends at the tail. There is a linear beginning and end to the clip and any subsequent clips that are being brought into that same timeline.
Layers:The different tracks in a sequence that are stacked on top of each other. A good editing software has an allowance for many (unlimited) video and audio tracks. Graphics and effects live on the video tracks. Normally the outermost track (video tracks mostly get added on top of each other) is the one being seen in the preview window. Audio tracks are ALL heard unless they are muted.
Bin: A software folder into which video clips and other editing assets get organized in.
Insider fact: The term bin is a leftover from the manual editing days (not too long ago), when the editing process the physical filmstrips would be hanging from a frame built on top of a bin. The top bar of the frame had small nails every half-inch or so from which the filmstrips would hang from their sprocket holes. The bin itself would catch any filmstrips that fell off the frame.
Head and Tail:Refers to the start and end of a video clip, or a timeline, or a sequence.
Edit Windows: Most professional editing software programs are set up in four main windows:
- Assets, organized in bins
- Source window
- Preview window
- Sequence, Timeline
The tools you use to work with these windows are often in toolbars on any of the screen edges. See sample below from Adobe Premiere CC.
- The assets window has all the different files and folders in it you are working with, as well as tabs or links to effects, transitions, and other apps.
- The source window shows you the video (or effect, or audio wave file) of the asset you are currently working with. I.e. choosing clips from to put into the timeline (for the most part)
- The sequence window shows you your timeline and
- The preview window shows you your edited video clip (sequence) at the moment where you are editing right now)
Trim, Cut, Split, and Splice:All ways to take apart your video clips.
When you trim your video, you remove the head and/or the tail of the clip (much like giving your hair a trim: you’re sprucing it up, but not touching the ‘meat’).
A cut is mostly referred to when you remove a section of your video clip, so you cut in two places and lift out the middle section and join the leftover video back together. If you have a very long video, you might just cut it into sections to work with separately, then you’re splitting your video. When you join two video clips together, you splice them.In all cases make sure you SAVE AS your entire video clip before you edit away. Depending on your software, you might lose your cut or trimmed part of the clip (this goes especially for in-phone apps!).
Transitions (dissolve, cross dissolve, fade in from black or white, and fade out to black or white): Video transitions are used to make cuts from one clip to another smoother or to start and finish a sequence. Many in-phone apps have transitions which might be cute for social media, but really don’t belong in video marketing for businesses, unless you cater to an audience that appreciates dizzying transitions. The most common transitions are fading up from black and fading down to black. Those can be used at the head and tail of a clip, but also from one cut to another – the length of the transition can be as short as a few frames.
Frame Rate: A film strip is nothing else but a rapid sequence of still images. Classic film was played back at 24 frames per second. That was the rate at which the human eye could no longer distinguish the single frame images and perceived the flow of images as seamless. Today, in video production we mostly use 30 frames per second and, if we don’t mind a more ‘video’ looking feel, even 60 frames per second. When editing around transitions sometimes a single frame can make the difference between a smooth transition (both for audio and video), a jarring one.
Looking for more lingo? Here a link to a very comprehensive (and very long) glossary of all things post-production.