Without going into crazy detail, it is important to get basic editing terminology right, to understand what some of the apps are offering and what some of the more advanced computer based softwares are talking about. Here a very basic glossary. The links connect to our on-line resource blog called Definition Day, where I post definitions of video marketing relevant words each week.
Linear vs. Non-Linear Editing: Ok, think TT (Throwback Thursday). In the not so distant, old days, editing was linear. You added one video clip to another in sequential order and going back and changing something, meant the entire sequence after your edit, meaning going forward, needed to be moved up as well. Think even further back to editing filmstrips: You took out a section of film you moved up the entire subsequent section to close the gap.
Today, all editing software is non-linear. Which mostly means that you can go into an edit totally unprepared and keep editing until you ‘strike gold’. As you can tell: I’m a fan of being prepared. A good edit is time consuming with a precise plan and can be totally overwhelming and exponentially more time consuming without one.
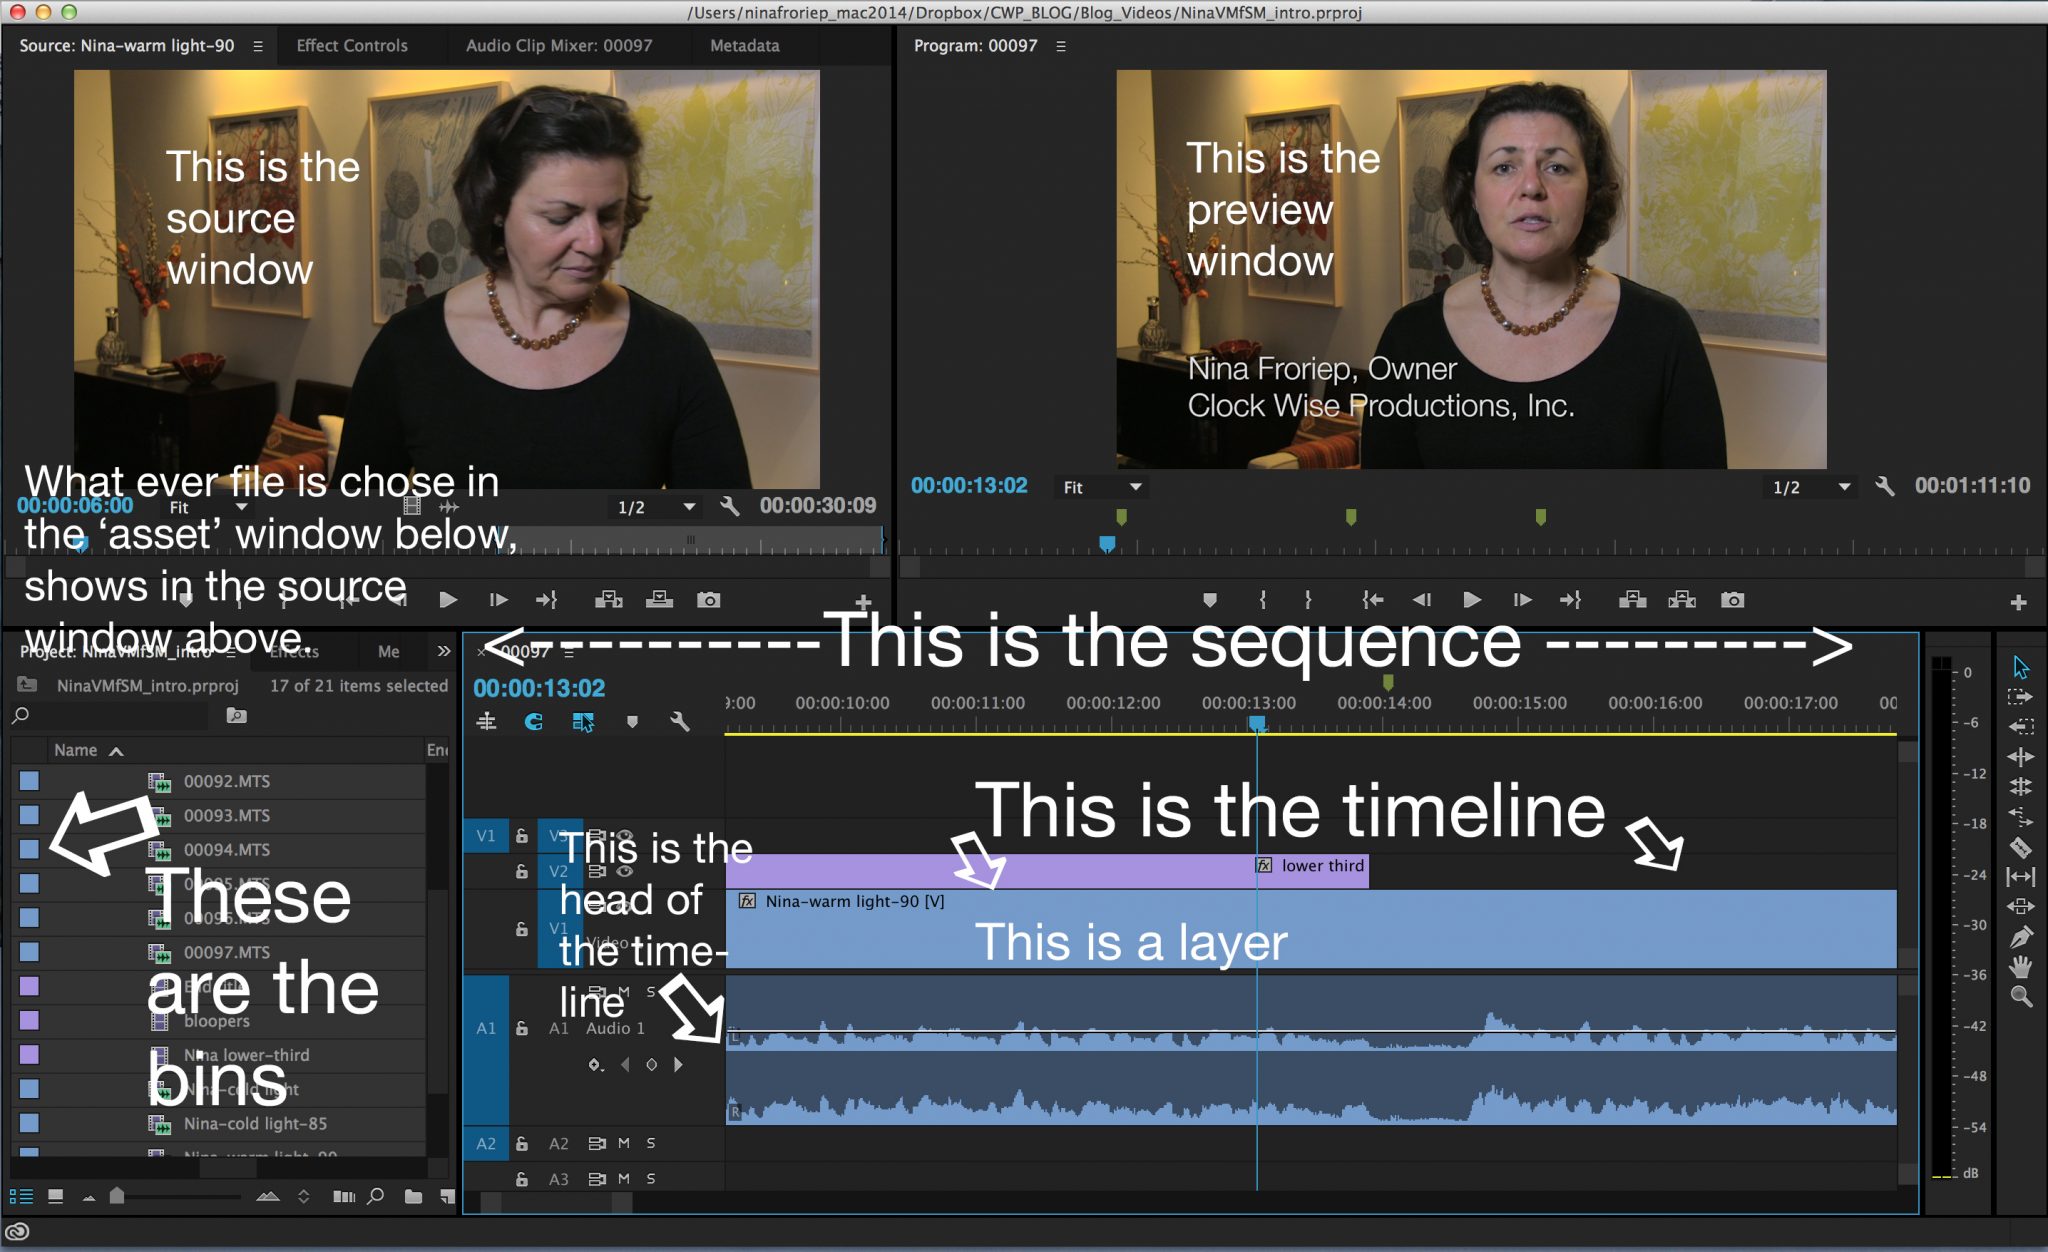
Sequence and Timeline: The video clips you are working with in an editing software are put into a sequence, which is defined as a set of things next to each other in a set order. The timeline is the graphical representation of that chronological sequence of events (i.e. video clips strung together).
A timeline starts at the head and ends at the tail. There is a linear beginning and end to the clip and any subsequent clips that are being brought into that same timeline.
Layers are the different tracks in a sequence that are stacked on top of each other. A good editing software has allowance for many (unlimited) video and audio tracks. Graphics and effects live on the video tracks. Normally the most outer track (video tracks mostly get added on top of each other) is the one being seen in the preview window. Audio tracks are ALL heard, unless they are muted.
A Bin is a software folder into which video clips and other editing assets get organized in. You’ll have many bins per project and we’ll talk about workflow and naming these bins next week.

Head and Tail refers to the start and end of a video clip, or a timeline, or a sequence.
Edit Windows: Most professional editing softwares are set up in four main windows:
- Assets, organized in bins
- Source window
- Preview window
- Sequence, Timeline
The tools you use to work with these windows are often in tool bars on any of the screen edges. See sample below from Adobe Premiere CC.
- The assets window has all the different files and folders in it you are working with, as well as tabs or links to effects, transitions, and other apps.
- The source window shows you the video (or effect, or audio wave file) of the asset you are currently working with. I.e. choosing clips from to put into the time line (for the most part)
- The sequence window shows you your timeline and
- The preview window shows you your edited video clip (sequence) at the moment where you are editing right now)
Trim, Cut, Split, and Splice are all done by cutting your video clips.
When you trim your video, you remove the head and/or the tail of the clip (much like giving your hair a trim: you’re sprucing it up, but not touching the ‘meat’).
A cut is mostly referred to when you remove a section of your video clip, so you cut in two places and lift out the middle section and join the leftover video back together. If you have a very long video, you might just cut it into sections to work with separately, then you’re splitting your video. When you join two video clips together, you splice them.
In all cases make sure you SAVE AS your entire video clip before you edit away. Depending on your software, you might lose your cut or trimmed part of the clip (this goes especially for in-phone apps!).
Transitions: dissolve, cross dissolve, fade in from black or white, and fade out to black or white: Video transitions are used to make cuts from one clip to another smoother, or to start and finish a sequence. Many in-phone apps have transitions which might be cute for social media, but really don’t belong into video marketing for businesses, unless of course you cater to an audience that appreciates dizzying transitions. The most common transitions are fading up from black and fading down to black. Those can be used at the head and tail of a clip, but also from one cut to another – the length of the transition can be as short as a few frames.
Frame Rate: A film strip is nothing else but a rapid sequence of still images. Classic film was played back at 24 frames per second. That was the rate at which the human eye could no longer distinguish the single frame images and perceived the flow of images as seamless. Today, in video we mostly use 30 frames per second and, if we don’t mind a more ‘video’ looking feel, even 60 frames per second. When editing around transitions sometimes a single frame can make the difference between a smooth transition (both for audio and video), a jarring one.
Here a link to a very comprehensive (but not as much fun) glossary of all things post production.
Herewith a link pack to all other blogs that cover video editing:
Nina’s Favorite Video Edit Apps | Original date 06/23/17
How to Hire a Video Editor: 5 Questions to Ask | Original date: 06/09/17
How to Approach Video Editing – VLOG | Original date: 05/26/17
How to Make Video Edits Work for You | Original date: 05/12/17
How to Approach DIY Video Editing | Original date: 04/29/16 | Update: 05/10/17
How to Create a Workflow and Organize an Edit | Original date: 05/13/16 | Update: 5/10/17


